


Party and decorations
Party and decorations
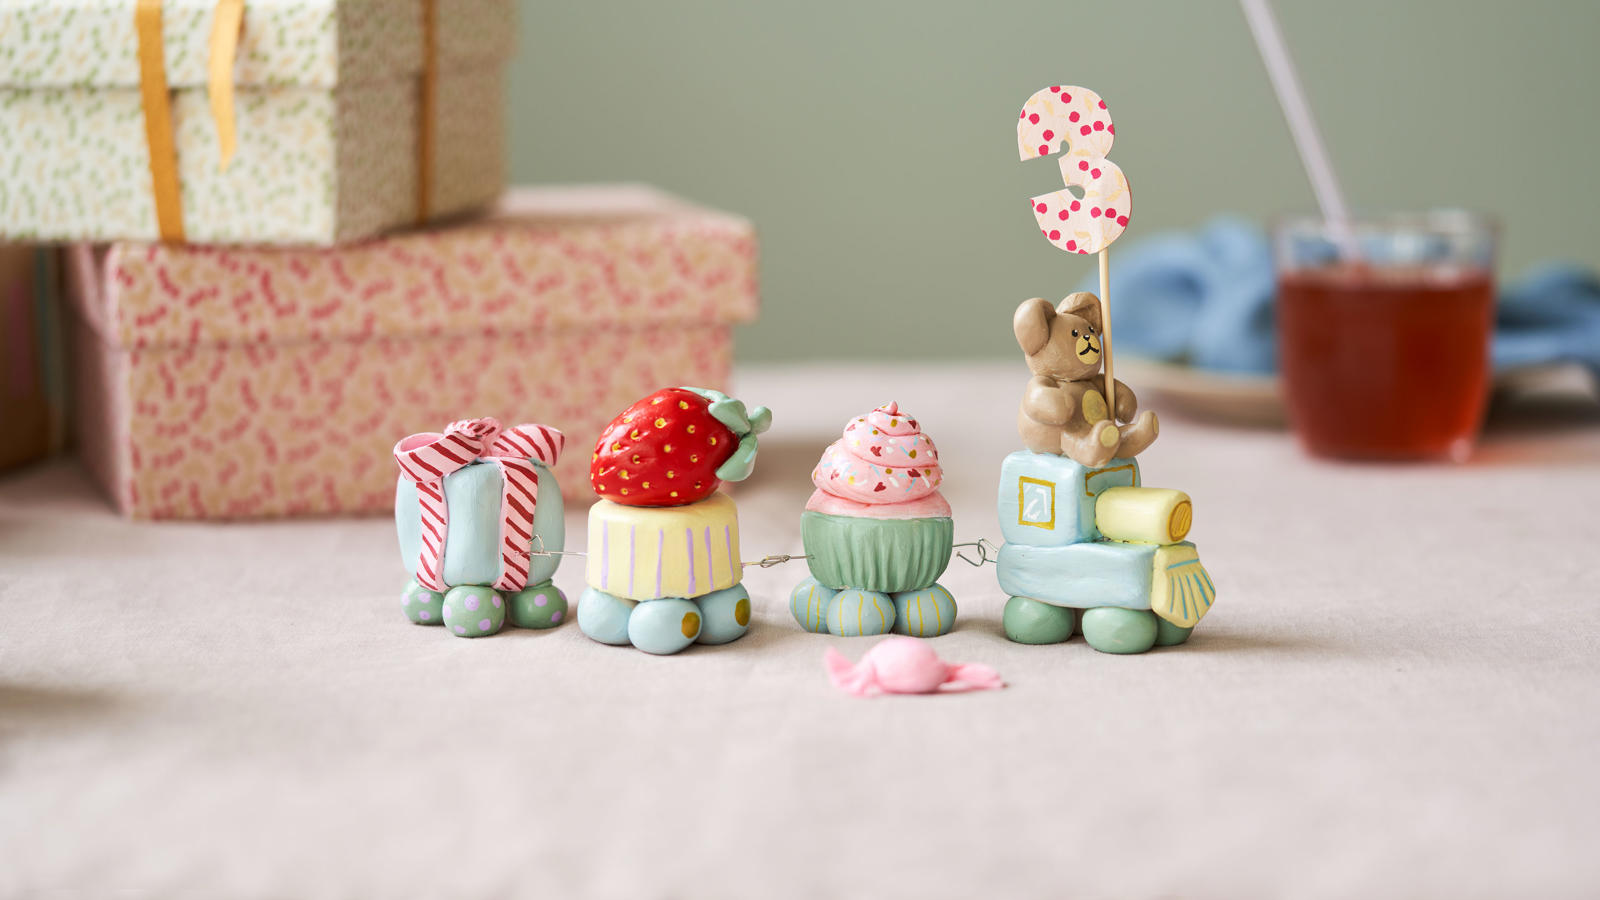
Clay birthday train
Anna and Clara are quite fond of traditions. "Little traditions make great memories," Anna says. Make a personal clay birthday train and put it out on the table every year on the child's birthday.
First, shape the little train wagons. In the guide and video, it is described how to make the front wagon with the teddy bear. The principles for how to work with the clay and attach the parts to each other are the same for the other wagons. It is a good idea to have a glass of water by your side as you work to smooth the clay as you go.
Roll four balls of equal size and place them across from each other in two pairs. These are the wheels for the teddy bear wagon.
Shape a flat rectangle from clay and attach the four little balls underneath it. Scratch the clay a bit on both rectangle and balls where they will meet and moisten the area a bit. This will help them stick together. The four balls should be underneath the rectangle as wheels when you place the wagon on the table.
Shape a square cube from clay and attach it to one end of the wagon. This is the cab of the wagon.
Roll a sausage of clay in the length from cab to edge of bottom rectangle. Attach it here.
Make a flat pentagon shape with a slight point and make grooves on front of it with your clay tools. You can also use an old vegetable knife to make the grooves. Place the pentagon on the front of the train below.
Now, shape the teddy bear. Roll a big ball, a slightly smaller ball and four slim sausages. These are body, head, arms and legs of the bear. Put them all together on top of the cab. Roll some small balls for ears, make a little notch in them and attach the ears to the teddy bear. Press facial features on the bear with your clay tools.
With a wooden stick, carefully make a hole from under the teddy bear's arm and down in the train where you can later put a number spear. Remove the wooden stick right away, so it does not get stuck in the clay as it dries.
Shape a hook from a metal rod and stick it into the back of the wagon.
Now, make more wagons with little elements, such as strawberry, present, cake, other animals etc. Add a metal hook in the front and back of the all wagons that go in the middle of the line, and at the front of the back wagon. Let the clay wagons dry with the hooks inside.
Cut out numbers from beautiful paper and glue them on separate wooden spears. This way, you can easily change out the spear to one with a new number every year.
When the wagons are dry, you can paint them. You can add details with glitter paint or acrylic markers. The acrylic markers are very good for details such as the face of the teddy bear, sprinkles on a cupcake etc.
-
Self-hardening clay
-
Clay tools
-
Paintbrushes
-
Metal rods
-
Cutting pliers
-
Wooden sticks
-
Wooden spears
-
Acrylic paint
-
Glitter paint
-
Acylic markers
-
Printed paper
-
Glue gun
