


Veislur og skreytingar
Veislur og skreytingar
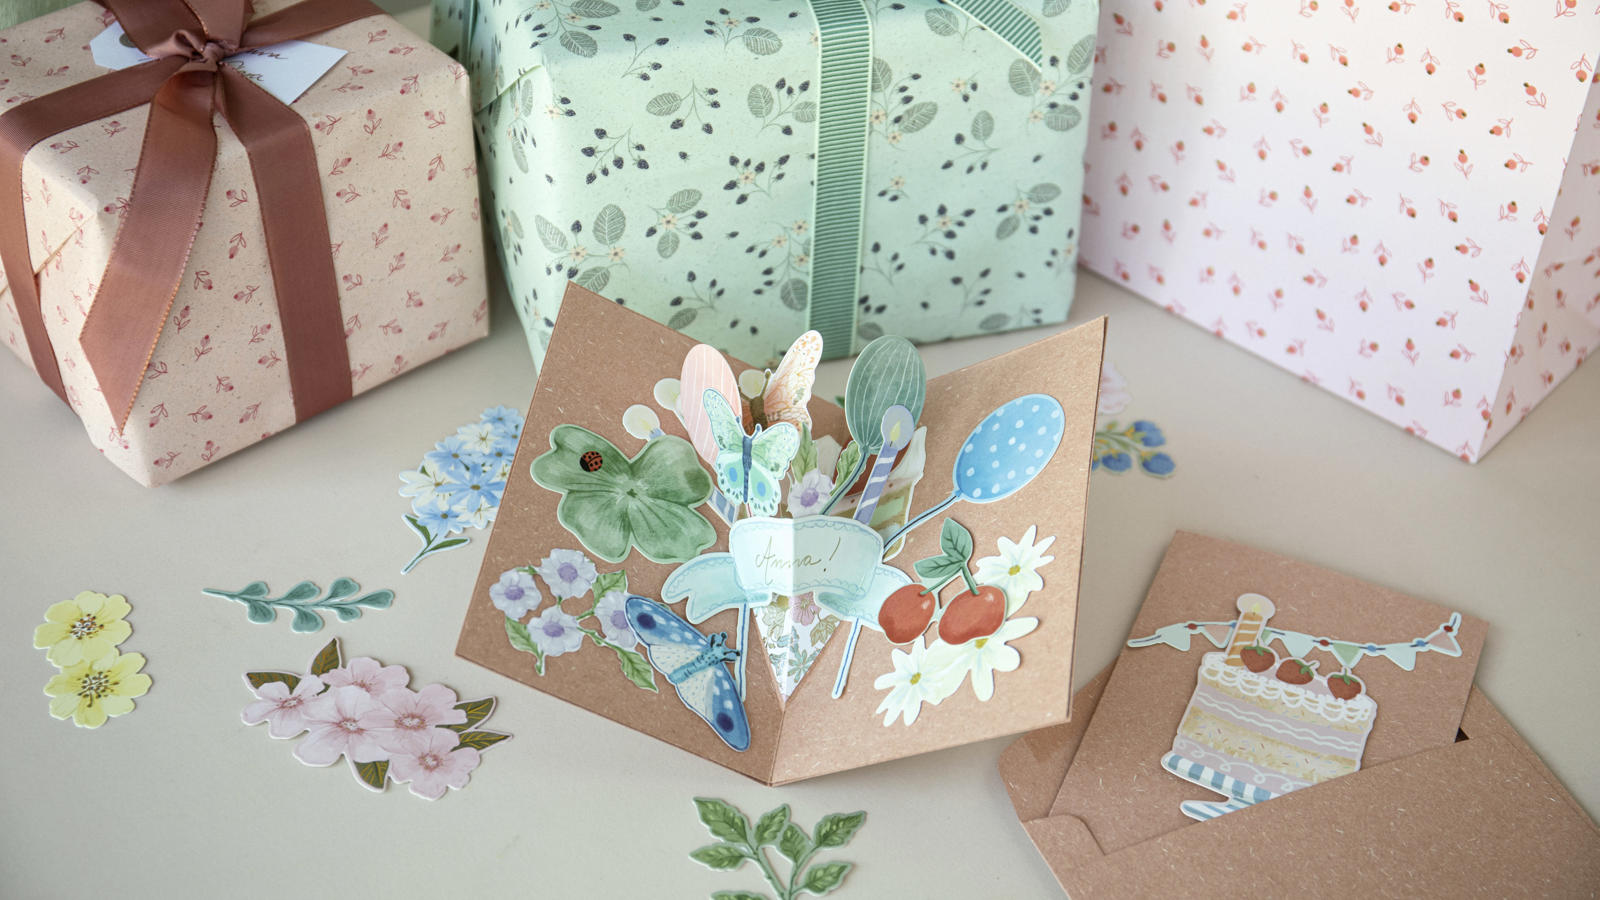
Sprettikort
Anna algjörlega heilluð af töfrum sprettikorta. Leyfðu systrunum að leiðbeina þér við að búa til þín eigin sprettikort, full af spennandi og yndislegum smáatriðum.
Byrjaðu á að finna til tvö samanbrotin kort í litum sem hæfa verkefninu. Klipptu annað kortið til svo það verði nokkrum millimetrum minna en hitt. Þetta kort verður innra kortið.
Næst skaltu skreyta framhlið stærra kortsins með tveimur pappírsformum að eigin vali. Í myndbandinu fánalengja orðið fyrir valinu sem er fest með tvíhliða límbandi ásamt fallegri köku sem er fest með límpúðum. Þú getur síðan skreytt meira með teikningum og skrift áður en þú leggur kortið til hliðar.
Taktu nú minna kortið og skerðu skáhallt í miðju brjótsins, eins og sýnt er í myndbandinu.
Dragðu út klippta fellinguna þegar þú lokar kortinu. Ef nauðsyn krefur skaltu nota áhöld til pappírsbrots til að tryggja að hliðar fellingarinnar haldist sléttar og flatar.
Veldu örk af föndurpappír og klipptu bút sem er örlítið minni en brotið sem kemur út þegar þú opnar kortið. Festu föndurpappírinn við brotið með tvíhliða límbandi.
Brjóttu nú borðapappírsformið í tvennt og festu það við fellinguna með tvíhliða límbandi. Sjáðu hvernig í myndbandinu.
Nú er komið að því að skreyta kortið með vel völdum pappírsformum, bæði á hliðunum á sprettiglugganum sjálfum. Þú getið líka valið að nota stansaðar myndir til að auka enn á skreytinguna. Anna mælir með að loka kortinu öðru hvoru til að tryggja að áfestar fígúrurnar nái ekki út fyrir brún kortsins, þannig að það passi vel í umslagið á eftir.
Ef vill má endurnýta hluta af umbúðapappanum til að búa til annað lag inni í sprettiglugganum og festa síðan blöðrur, fiðrildi og blóm á það.
Þegar þú ert búinn að skreyta kortið er kominn tími til að setja kortin tvö saman. Límdu fjóra tvíhliða límbandsbúta á hvora hlið stærra kortsins og festu minna, skreytta kortið við það.
Notaðu tússpenna til að skrifa persónulega kveðju utan á kortið sem og á áfestann borða inni í því, þannig að hún blasi við þegar kortið er opnað.
Nú er kortið tilbúið til að gleðja heppinn viðtakanda.
-
Tvöfalt kort með umslagi
-
Tvíhliða límband
-
Límpúðar
-
Skæri
-
Pappírsform fyrir DIY kort
-
Föndurpappír
-
Úrklippur
-
Áhöld fyrir pappírsbrot
-
Tvöfaldir tússpennar


